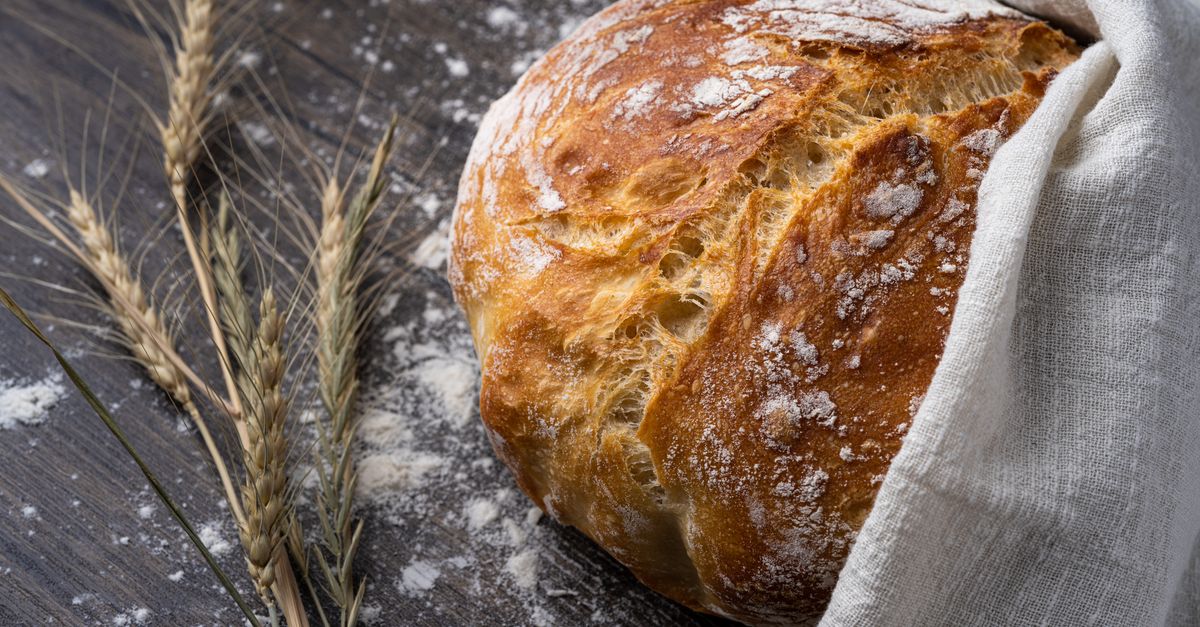
Why Your Homemade Bread is Dense and Crumbly (And The Simple Secrets to a Light, Airy Loaf Every Time)
You’ve spent the afternoon kneading, waiting for that beautiful dough to rise, anticipating the aroma of freshly baked bread. But then, it comes out of the oven: a brick. Dense, heavy, and crumbly, completely devoid of those coveted airy pockets that make a good loaf truly satisfying. I’ve been there more times than I care to admit. For years, my homemade bread was either a glorified doorstop or just… fine. Never that elusive, perfect, airy crumb I craved.
Most bread recipes make it sound so simple: flour, water, yeast, salt. Mix, knead, rise, bake. What they often gloss over are the subtle, crucial nuances that separate a decent loaf from a truly exceptional one. It’s not about magic; it’s about understanding the science and respecting the process. The mistake I see most often, and the one I made myself for too long, is treating bread-making like a rigid formula rather than a dynamic interaction with living ingredients. What changed everything for me was a shift in perspective, focusing on the why behind each step, not just the what.
I’ve tried every shortcut, every ‘easy’ recipe, only to be met with disappointment. But through persistent trial and error, I’ve uncovered the core reasons why most homemade bread turns out dense and how to consistently achieve that light, open, chewy texture that rivals any artisan bakery. It’s not about expensive equipment or exotic flours; it’s about precision, patience, and a few often-overlooked techniques.
Key Takeaways
- Precise ingredient measurement, especially flour and water, is fundamental to dough hydration and structure.
- The right water temperature is crucial for activating yeast without killing it, impacting rise and final texture.
- Developing gluten properly through effective kneading builds the elastic network needed for an open crumb.
- Adequate fermentation, paying attention to time and temperature, allows yeast to produce gases for airiness.
- Proper baking technique, including steam, ensures a crisp crust and allows the crumb to set beautifully.
The Hidden Enemy: Inaccurate Ingredient Measurement
When I first started baking, I’d casually scoop flour straight from the bag with a measuring cup, leveling it off with a knife. Seemed fine, right? Wrong. This seemingly innocuous habit was one of the biggest sabotages to my bread. A cup of flour, depending on how packed it is, can vary by as much as 30-50 grams. In baking, especially with bread, that’s an enormous difference that radically alters the hydration of your dough.
Dough hydration is the ratio of water to flour. Too much flour (or not enough water) makes a stiff, unyielding dough that’s hard to knead, impossible to develop gluten in, and results in a dense, tight crumb. Think of it like trying to inflate a stiff, dry balloon versus a flexible, elastic one. The dry balloon won’t stretch to hold much air.
What actually works: Invest in a digital kitchen scale. This is non-negotiable for consistent, airy bread. Weigh your flour and water in grams. Most professional recipes provide measurements by weight for this exact reason. Aim for recipes with hydration levels between 65-75% for a good starting point. For example, if you use 500g of flour, 325g-375g of water (65-75% hydration) will yield a manageable dough that still has enough moisture for a good crumb structure. This simple shift alone will dramatically improve your bread’s texture.
Beyond just weight, consider the type of flour. All-purpose flour has a lower protein content than bread flour, meaning it forms less gluten. If a recipe calls for bread flour and you use all-purpose, you’ll likely need to adjust the hydration slightly or accept a slightly different texture. In my kitchen, I now exclusively use a scale for flour and water, and my dense loaves are a distant memory.
The Yeast Paradox: Too Hot, Too Cold, Just Right
Yeast is a living organism, and like any living thing, it has preferences. For the longest time, I’d just use lukewarm water, assuming it was ‘good enough.’ But the temperature of your water is a surprisingly critical factor in yeast activation and the subsequent rise of your bread.
Too hot, and you kill the yeast. This is the fastest way to a flat, dense loaf. Dead yeast means no gas production, no rise, no air pockets. Even water that feels ‘just warm’ to your hand can be too hot for yeast, especially if you’re using instant yeast that doesn’t require proofing.
Too cold, and the yeast is sluggish. It won’t activate properly, or it will work so slowly that your dough takes an eternity to rise, often resulting in a less active fermentation and a tighter crumb. It’s like trying to get a sleepy person out of bed—they’ll eventually move, but slowly and reluctantly.
What actually works: The sweet spot for yeast activation is typically between 95°F and 105°F (35°C and 40°C). Use a kitchen thermometer to precisely measure your water temperature. For active dry yeast, I always proof it first in a small amount of this temperature water with a pinch of sugar. If it foams up within 5-10 minutes, your yeast is alive and happy. For instant yeast, you can mix it directly with the flour, but maintaining the correct water temperature is still vital for optimal performance. This small investment in a thermometer will eliminate guesswork and ensure your yeast is always ready to work its magic.
I vividly remember a winter where my kitchen was notoriously cold. My doughs were consistently under-proofed and dense, despite following all other steps. Once I started warming my water to a precise 100°F (38°C), even with instant yeast, the difference in the initial rise and final crumb was profound. The yeast, finally in its happy place, produced a much more vigorous and even fermentation.
The Kneading Conundrum: Under vs. Over
Kneading is where the magic of gluten development happens. Gluten is the protein network in flour that traps the gases produced by yeast, creating those lovely airy pockets. Without sufficient gluten development, your dough won’t have the elasticity to stretch and hold those gases, leading to a dense, tight crumb.
Most beginners, myself included, either under-knead or over-knead. Under-kneading leaves you with a shaggy, weak dough that tears easily and can’t hold its structure. Over-kneading, while less common by hand, can also damage the gluten network, resulting in a sticky, slack dough that also struggles to rise properly.
What actually works: The goal is to achieve a smooth, elastic, and extensible dough that passes the ‘windowpane test.’ To perform this, tear off a small piece of dough and gently stretch it between your fingers. If you can stretch it thin enough to see light through it without tearing, your gluten is sufficiently developed. If it tears easily, keep kneading. This usually takes 10-15 minutes by hand for most doughs or 5-8 minutes in a stand mixer.
Don’t be afraid of sticky dough, especially with higher hydration recipes. Use a bench scraper to manage it and lightly flour your hands and work surface if necessary, but avoid adding too much extra flour, which will throw off your hydration. For me, the windowpane test was a revelation. It moved me from guessing ‘is it done?’ to having a clear, visual indicator of readiness. My arms might ache a little more on kneading days, but the results are worth every push and pull.
The Unsung Hero: Proofing Conditions
Proofing, or fermentation, is arguably the most crucial step for an airy crumb. This is when the yeast goes to work, consuming sugars and producing carbon dioxide gas, which inflates the dough. Many home bakers rush this stage or don’t provide the optimal environment, leading to a multitude of problems.
Under-proofing means the yeast hasn’t had enough time to produce sufficient gas. Your dough will be dense and heavy because there aren’t enough trapped air bubbles. The loaf will have a very tight, compact crumb.
Over-proofing is also a problem. If the yeast goes too far, the gluten structure can weaken and collapse, unable to hold the gas. When baked, an over-proofed loaf will often collapse in the oven, leading to a flat, sometimes gummy texture.
What actually works: Temperature and time are your best friends. Yeast is most active in warm environments. Aim for a consistent proofing temperature between 75°F and 85°F (24°C and 30°C). If your kitchen is cold, create a makeshift proofing box: place your dough in an oven (turned off!) with a bowl of hot water, or use a proofing setting if your oven has one. The ideal rise for the first proof is typically to double in size, and for the second proof, to increase by about 50-75%.
Learn to look for visual cues rather than just relying on recipe times. The ‘poke test’ is invaluable for the second rise: gently press a floured finger into the dough. If the indentation springs back immediately, it’s under-proofed. If it stays indented and doesn’t spring back at all, it’s over-proofed. If it springs back slowly, it’s just right. This touch-based feedback has saved countless loaves in my kitchen. During colder months, I rely heavily on my oven’s proofing function set to a low 80°F (27°C) to ensure a reliable rise.
The Baking Chamber: Steam and Oven Spring
Many home bakers simply preheat their oven and pop in the dough. While this technically bakes the bread, it misses a critical component for that beautiful, airy crumb and crisp crust: steam.
When bread first hits a hot oven, it experiences a rapid expansion called ‘oven spring.’ This is the final burst of rise as the yeast has one last hurrah and the gasses expand before the crust sets. Without steam, the crust forms too quickly and becomes rigid, preventing the dough from expanding to its full potential, thus trapping the gases in a tighter matrix and resulting in a denser loaf.
What actually works: Introduce steam during the initial baking phase (the first 10-15 minutes). You can achieve this in several ways:
- Dutch Oven: My preferred method. Preheat your Dutch oven with the lid on to a very high temperature (450-500°F / 230-260°C). The enclosed space traps the moisture released by the dough, creating a perfect steamy environment. Bake with the lid on for 20-30 minutes, then remove the lid to finish baking for a crisp crust.
- Water Tray: Place an oven-safe pan on the bottom rack of your oven while preheating. Carefully pour a cup of boiling water into it just as you place the bread in the oven. The steam will fill the oven. Be careful not to splash yourself or directly hit the oven elements.
- Spray Bottle: Lightly mist the oven walls with water after placing the dough, repeating once or twice in the first few minutes (be quick to avoid losing too much heat).
The high heat and steam create a thin, stretchy skin on the dough, allowing it to expand dramatically before setting. This maximizes oven spring, which in turn leads to a lighter, more open crumb. After switching to a Dutch oven for most of my artisan loaves, the difference was immediate and transformative. My loaves finally had that rustic, crackly crust and an undeniably airy interior, much like the bakery-bought ones.
Frequently Asked Questions
Q: Why does my bread taste bland if it’s airy?
A: An airy crumb is excellent, but flavor comes from fermentation time and ingredients. If your bread is bland, consider a longer, colder first proof (known as bulk fermentation), perhaps overnight in the refrigerator. This allows more complex flavors to develop. Also, ensure you’re using enough good-quality salt, as it’s crucial for flavor and also controls yeast activity. Sometimes, using a small amount of sourdough starter or a pre-ferment (like a poolish or biga) can also add significant depth, even to yeasted breads.
Q: Can I use all-purpose flour for airy bread, or do I need bread flour?
A: While bread flour, with its higher protein content, is ideal for developing strong gluten and thus a very airy crumb, you can absolutely make airy bread with all-purpose flour. The key is to be mindful of its lower protein. You might need to use a slightly lower hydration ratio or knead for a bit longer to achieve sufficient gluten development. Don’t be discouraged if the ‘windowpane test’ is a bit harder to achieve with all-purpose flour; aim for good elasticity and extensibility nonetheless. Many great European breads are made with lower protein flours.
Q: My dough is too sticky to handle, what should I do?
A: Very sticky dough often indicates a high hydration, which is actually desirable for an open, airy crumb. Don’t immediately add more flour, as this will reduce your hydration and make the bread denser. Instead, use a bench scraper to handle the dough, wet your hands slightly, or oil them. You can also incorporate the ‘stretch and fold’ method during bulk fermentation instead of constant kneading. This builds gluten gently without excessive handling. Give it time; as gluten develops, even sticky dough becomes more manageable. Also, ensure your work surface is only lightly floured or oiled.
Q: Why does my bread crust get hard and thick, not thin and crispy?
A: A hard, thick crust usually points to insufficient moisture (steam) in the oven during the initial baking phase. Without steam, the crust forms too quickly and rigidly. Revisit the ‘Baking Chamber: Steam and Oven Spring’ section. Using a Dutch oven is the most effective way to trap moisture and create that thin, crispy, almost glassy crust. If you’re using a water tray, ensure the water is boiling hot when it enters the oven, and the pan is not too small to evaporate quickly. Also, make sure your oven isn’t running too hot for too long; a very hot oven can set the crust too fast.
The Path to Your Perfect Loaf
Baking truly airy homemade bread isn’t about magical ingredients or luck; it’s about understanding the fundamental principles at play and applying them with precision and patience. I spent years making dense, crumbly loaves, but these insights transformed my bread-making from a frustrating chore into a deeply satisfying art. From the moment I started weighing my ingredients to embracing the power of steam, each small adjustment unlocked a new level of quality in my loaves. My kitchen now consistently produces bread with that sought-after open, chewy crumb that makes every sandwich, every slice, an absolute delight.
Don’t let past dense disasters discourage you. Start with one change, like getting a kitchen scale, and observe the difference. Then, gradually incorporate the other techniques. The journey to the perfect airy loaf is a delicious one, and with these adjustments, you’re well on your way to baking bread that doesn’t just fill your belly, but truly delights your senses.
Written by Mark Johnson
Personal Finance & Frugal Living
A financial literacy advocate dedicated to making smart money management simple and achievable for everyone.
You Might Also Like

Why Your Home Still Feels Stale (Even After Cleaning) — And What Actually Works for Real Freshness
Discover why your home still smells stale after cleaning and learn practical, non-obvious strategies for true, lasting freshness.
Why Your Homemade Cookies Are Flat, Not Puffy (And The Simple Shifts That Guarantee Perfect, Puffy Results Every Time)
Ever wonder why your homemade cookies spread too thin? Discover the overlooked factors and simple shifts for achieving perfectly puffy, soft cookies.

Why Your Homemade Sauces Are Greasy, Not Velvety (And The Pro Secrets for Silky Perfection Every Time)
Struggling with greasy, separated sauces? Learn the pro secrets to emulsify like a chef and achieve velvety perfection every time.